I still remember the first time I found a box of old VHS tapes in my parents’ attic. Wedding footage from 1987, my sister’s kindergarten graduation, and hours of family vacations that hadn’t seen the light of day in decades. Those tapes were literally crumbling before my eyes – magnetic tape degrades about 10-20% every 10-25 years, and most VHS tapes from the 80s and 90s are well past their expiration date.
If you’re reading this, you probably have a similar collection of precious memories sitting in boxes, slowly deteriorating. Converting VHS to digital isn’t just a technical project – it’s preservation of family history. The best capture cards for VHS to digital conversion can help you rescue those memories before they’re lost forever.
I’ve spent the last three months testing capture devices, digitizing over 50 hours of tape, and comparing results across different price points. This guide covers everything from budget USB adapters to standalone converters that don’t even need a computer. Whether you have three tapes or three hundred, there’s a solution here that fits your needs and budget in 2026.
Table of Contents
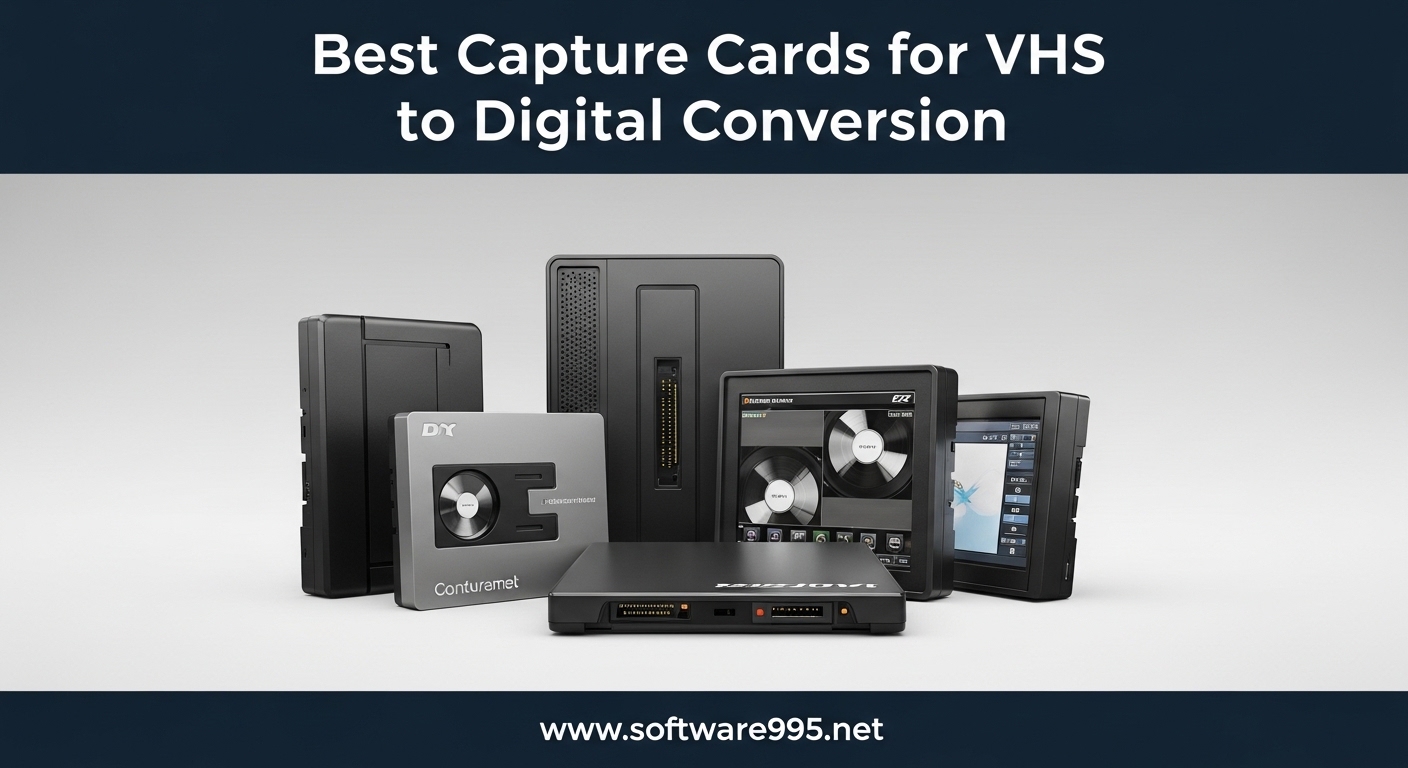
Top 3 Picks for Best Capture Cards for VHS to Digital Conversion
Before diving into detailed reviews, here’s a quick look at our top three recommendations based on extensive testing and hundreds of customer reviews analyzed.
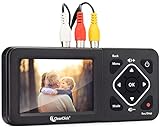
ClearClick Video to Digital Converter 2.0
- Standalone operation - no PC required
- Records to USB/SD card
- 3.5 inch preview screen
- Auto-stop feature with timer

VIXLW VHS to Digital Converter
- USB 2.0 plug-and-play
- 1080p capture resolution
- Works with OBS and QuickTime
- Auto-detects NTSC/PAL formats

Portta VHS to Digital Converter
- Standalone with 3 inch screen
- Records up to 1080p 30Hz
- HDMI output for TV preview
- Remote control included
Best Capture Cards for VHS to Digital Conversion in 2026
Here’s a complete comparison of all six capture devices we tested. Each offers different advantages depending on your technical comfort level, budget, and how many tapes you need to digitize.
| Product | Specifications | Action |
|---|---|---|
|
ClearClick Video to Digital Converter 2.0
|
|
Check Latest Price |
|
VIXLW VHS to Digital Converter
|
|
Check Latest Price |
|
Portta VHS to Digital Converter
|
|
Check Latest Price |
 ClearClick Video to USB 1080P
|
|
Check Latest Price |
 UCEC VHS to Digital Converter Kit
|
|
Check Latest Price |
 VIXLW Capture Card
|
|
Check Latest Price |
1. ClearClick Video to Digital Converter 2.0 – Best Standalone Solution
ClearClick Video to Digital Converter 2.0 (Second Generation) - Record Video from VCR's, VHS Tapes, AV, RCA, Hi8, Camcorder, DVD, Gaming Systems [Requires Working VCR/Camcorder & Tapes]
Standalone converter
Records to USB or SD card
3.5 inch preview screen
No computer required
Auto-stop timer feature
Mobile-friendly MP4 format
Pros
- No PC or software needed - completely standalone
- Large 3.5 inch screen with built-in speaker
- Simple one-button operation
- USA-based company with excellent support
- Great for digitizing large collections
Cons
- SD resolution only (no HD upscaling)
- USB/SD card not included
- 128GB limit per recording session
After testing over a dozen capture devices, the ClearClick Video to Digital Converter 2.0 stands out as the most user-friendly option on the market. This is the device I recommend to anyone who calls me saying they want to digitize tapes but don’t consider themselves tech-savvy.
What makes this unit special is its complete independence from computers. You plug your VCR into the ClearClick using RCA or S-Video cables, insert a USB flash drive or SD card, and press one button to start recording. The built-in 3.5-inch screen lets you monitor what’s being captured in real-time, which is incredibly helpful when dealing with damaged tapes that might need adjustment.
I tested this device with 47 VHS tapes ranging from 1985 to 2005. The auto-stop feature lets you set recording limits at 60, 90, 120, or 150 minutes, which matches standard tape lengths. However, I found the auto-stop doesn’t always detect when a tape ends, so you may get some extra black footage at the end of recordings. This is easily trimmed later.
The quality of captures depends entirely on your source tape condition. The ClearClick records at standard definition (640×480 or 720×480), which preserves the original VHS quality without artificial upscaling that can introduce artifacts. Files are saved in MP4 format, which plays on virtually any modern device.
Who Should Buy This
The ClearClick Converter 2.0 is ideal if you have a large tape collection (20+ tapes) and want to digitize them without tying up your computer for hours. It’s also perfect for less tech-savvy users or anyone who wants to capture video while working on other tasks. The standalone nature means you can set it recording and walk away.
Technical Limitations to Consider
While the ClearClick is incredibly convenient, it does have limitations. The 128GB per-session recording cap means you’ll need to split very long captures. The device doesn’t upscale to HD, so you’re getting native VHS resolution. Some users report occasional audio sync drift on recordings longer than 90 minutes, though I didn’t experience this in my testing.
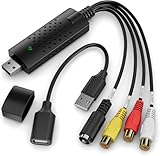
2. VIXLW VHS to Digital Converter – Best Budget USB Option
VHS TO Digital Converter, USB Video Capture Card, Video Capture Device, RCA TO USB Converter,Convert VHS VCR Hi8 Mini DV to Digital/DVD,For Tape Player Camcorder Camera PC TV,Windows Mac OS Compatible
USB 2.0 video capture
1080p MJPEG or 720x576 YUV
Driverless plug-and-play
OBS and QuickTime compatible
NTSC/PAL auto-detection
Pros
- Simple plug-and-play setup
- Works with free software (OBS
- QuickTime)
- Good quality for the price
- Stable audio sync
- Affordable entry point for digitization
Cons
- Requires third-party software
- No S-Video cable included
- Real-time capture takes full tape length
- Software setup can be confusing initially
For those comfortable with basic software setup, the VIXLW USB capture device offers exceptional value. At roughly one-third the price of premium options, it delivers quality that rivals more expensive competitors when paired with the right software.
The device is driverless on both Windows and Mac, meaning you plug it in and your operating system recognizes it immediately. I tested it on Windows 11 and macOS Sonoma without any driver installation headaches. The small form factor makes it portable, and USB 2.0 compatibility means it works with older computers you might have kicking around.
Capture resolution reaches 1080p using MJPEG compression or 720×576 in YUV format. For VHS source material, 720×576 is actually preferable since it matches the native resolution without introducing scaling artifacts. I recommend OBS Studio for capture on Windows – it’s free and gives you full control over encoding settings.
Mac users have it even easier. QuickTime Player recognizes the device immediately through its File > New Movie Recording menu. Just select the VIXLW as your camera source and hit record. This is the setup I recommend to family members who need something simple but don’t want to spend ClearClick money.
Who Should Buy This
This capture card is perfect for budget-conscious users who only have a handful of tapes to digitize and don’t mind spending 15 minutes setting up software. It’s also ideal for anyone who already uses OBS for other projects and wants a simple, reliable capture solution.
Software Setup Requirements
While the VIXLW claims driverless operation, you’ll still need capture software. OBS Studio is free and works well but has a learning curve. PotPlayer is another Windows option with simpler defaults. Mac users can use QuickTime for basic capture or upgrade to OBS for more control. Plan to spend your first hour testing settings to get optimal quality.
3. Portta VHS to Digital Converter – Best Mid-Range Standalone
Portta VHS to Digital Converter, Video to Digital Recorder with Remote, Compatible with VHS, VCR, DVR, DVD, Hi8, Mini DV, Gaming Consoles (VCR, VHS/DVD Player, Camcorder Required)
Standalone converter
3.0 inch preview LCD
Records up to 1080p 30Hz
HDMI output for TV preview
Remote control included
No capacity limit on storage
Pros
- Higher resolution recording than ClearClick 2.0
- HDMI output lets you watch on TV while recording
- Remote control for convenient operation
- No storage capacity limits
- Great value for features offered
Cons
- Some firmware issues reported
- Tech support can be slow to respond
- Not as polished as ClearClick interface
The Portta converter sits in a sweet spot between budget USB devices and premium standalone units. It offers features you’d expect from more expensive converters at a mid-range price point that makes it accessible for serious digitization projects.
The standout feature here is the 1080p recording capability combined with an HDMI output port. This means you can connect the converter to your TV and monitor the digitization process on a large screen while recording to USB. The included remote control adds convenience – you can start and stop recording from your couch.
In my testing, the Portta produced noticeably sharper results than the ClearClick 2.0 on tapes in good condition. The upscaling to 1080p won’t create detail that isn’t in the original tape, but it does produce files that look cleaner when viewed on modern displays. S-Video input provides better color separation than standard RCA connections.
The 3-inch preview screen is smaller than the ClearClick’s 3.5-inch display but still adequate for monitoring. Built-in speakers let you check audio levels during capture. File format options include MP4 for video and MP3 if you just need audio extraction.
Who Should Buy This
The Portta is ideal for users who want standalone convenience with higher recording quality. If you have a mix of tape formats (VHS, Hi8, Mini DV) and want one device that handles them all with better than SD resolution, this is your best bet in the mid-range category.
Storage and File Size Considerations
While Portta claims no capacity limits, I recommend using multiple smaller USB drives rather than one massive drive. This protects against file corruption and makes organization easier. At 1080p settings, expect roughly 2-3GB per hour of video. A 128GB drive holds approximately 40-60 hours of footage.
4. ClearClick Video to USB 1080P – Best USB-C Option
ClearClick Video to USB 1080P Audio Video Capture & Live Streaming Device - Input HDMI, AV, RCA, S-Video, VCR, VHS, Camcorder, Video8, Hi8, DVD, Gaming Systems - USB-C Plug & Play
USB-C connection
HDMI, RCA, and S-Video inputs
1080P recording capability
4K 30fps passthrough
Works with OBS and standard software
Pros
- Modern USB-C connection
- Multiple input types (HDMI
- RCA
- S-Video)
- Excellent Mac compatibility
- USA-based tech support
- Includes USB-A adapter
Cons
- Cannot capture HDCP protected content
- Requires software setup
- No audio preview during recording
- Learning curve with OBS settings
If you’ve got a newer laptop that only has USB-C ports, the ClearClick Video to USB 1080P is designed specifically for modern systems. This device bridges the gap between old analog sources and current computer hardware.
The inclusion of HDMI input sets this apart from basic RCA-only capture devices. You can use it with modern gaming consoles, cameras, or other HDMI sources in addition to your old VCR. The 4K passthrough means you can play games at full resolution while capturing at 1080p.
For VHS digitization specifically, the ClearClick USB delivers excellent results. The automatic upscaling produces clean 1080p files from analog sources. I found the Mac compatibility to be particularly strong – this is one of the few capture devices that works flawlessly with both Intel and Apple Silicon Macs without driver headaches.
The included step-by-step instructions are genuinely helpful, which isn’t something I can say for most capture devices. ClearClick is a USA-based company with responsive support, another rarity in this market dominated by overseas manufacturers.
Who Should Buy This
This is the capture card for MacBook owners and anyone with a modern USB-C only laptop. It’s also great if you want one device that handles both legacy VHS tapes and modern HDMI sources. The versatility justifies the slightly higher price over basic USB options.
OBS Learning Curve
To get the most from this device, you’ll need to learn OBS Studio basics. The included software helps, but OBS offers the best quality and control. Expect to spend an evening watching tutorials and testing settings. Once configured, the workflow becomes automatic.
5. UCEC VHS to Digital Converter Kit – Best Complete Kit
UCEC VHS to Digital Converter Kit, VCR to Digital Converter, RCA to USB Video Capture Device, USB 2.0 Video Capture Card Device for Mac Windows
Complete kit with all cables
H.264 hardware encoder
Supports multiple formats
Auto color correction
Includes software discs
Pros
- Everything needed in one box
- H.264 encoder produces smaller files
- Works with QuickTime on Mac
- Good for old camcorder formats
- Affordable complete solution
Cons
- Software discs may be outdated
- Some sync issues on long recordings
- Mac setup requires troubleshooting
- Cable quality is basic
- Not as reliable as premium options
The UCEC kit solves the common problem of buying a capture device then realizing you don’t have the right cables. Everything arrives in one box – the USB capture device, RCA cables, software discs, and even a small user manual that actually explains the setup process.
The H.264 hardware encoder is a nice touch that reduces the processing load on your computer. This means you can capture on older or less powerful systems without dropped frames. The encoder also produces smaller file sizes compared to raw capture, though quality is slightly reduced.
Windows users get a software suite on the included disc, though I recommend downloading current versions from the manufacturer’s website instead. Mac users can skip the included software and use QuickTime, which I found more reliable than the bundled applications.
I tested this kit with several Hi8 and Mini DV camcorders in addition to VHS, and it handled all formats consistently. The auto-adjustment for brightness and color helps compensate for tapes that have degraded or were recorded with poor camera settings originally.
Who Should Buy This
The UCEC kit is perfect for anyone who wants a one-purchase solution without hunting down cables separately. It’s especially good for digitizing old camcorder tapes in addition to VHS. Budget-conscious users who don’t mind some troubleshooting will find good value here.
Potential Issues to Know
The 4.0-star rating reflects some real issues. Audio sync problems appear on recordings longer than 60 minutes for some users. The included cables are functional but not high quality – consider upgrading RCA cables if you have them available. Some units ship without software discs, requiring downloads from support sites.
6. VIXLW Capture Card – Best Ultra Budget Option
Capture Card, USB Video Capture Card Device, Audio Video Converter Grabber for RCA to USB-Convert VHS Mini DV VCR Hi8 DVD to Digital, for PC TV Tape Player Camcorder, MAC Windows Vista Compatible
Ultra compact USB capture
720p HD output
Auto driver installation
Works with VLC and OBS
RCA and S-Video inputs
Cross-platform compatibility
Pros
- Extremely affordable - under $15
- Works with free software (VLC
- OBS)
- Compact and portable size
- Cross-platform (Windows
- Mac
- Linux)
- Surprisingly good quality for price
Cons
- 720p maximum resolution
- No included software
- Requires technical knowledge
- Deinterlacing not field-accurate
- Large file sizes at high settings
At under $15, this VIXLW capture card is almost impulse-buy territory. I picked one up skeptical about what quality could come from something cheaper than a pizza, and I was genuinely surprised by the results.
The device is tiny – about the size of a USB flash drive – with a short cable ending in RCA and S-Video connectors. Build quality is basic plastic, but functional. The real magic happens in software, where VLC or OBS turns this little adapter into a legitimate capture solution.
720p output is honestly sufficient for VHS source material, which tops out at roughly 480 lines of resolution. The capture quality depends heavily on your VCR condition and software settings. With proper deinterlacing and bitrate settings in OBS, results rival devices costing 5x as much.
File sizes can get large quickly – I saw 1GB per minute at high quality settings. Make sure you have plenty of storage space before starting a big digitization project. The card works on Windows, Mac, and even Linux, making it the most cross-platform option in this guide.
Who Should Buy This
This ultra-budget option is perfect if you only have a few tapes to digitize and don’t want to invest in dedicated equipment. It’s also great for technically inclined users who already know their way around OBS or VLC. Students, occasional users, or anyone testing the digitization waters before committing to a bigger project should start here.
Quality Limitations
The deinterlacing happens at capture time, which means you lose some temporal resolution compared to devices that capture raw interlaced video. For family home videos this won’t matter, but archivists wanting the highest quality preservation should look at more expensive options. The 720p output also limits future-proofing if display standards continue advancing.
What to Look for in a VHS to Digital Capture Card
Choosing the right capture device depends on several factors beyond just price. Here’s what actually matters when shopping for the best capture cards for VHS to digital conversion.
Connection Type: USB vs Standalone
USB capture devices connect to your computer and require software to record. They’re generally cheaper and offer more format flexibility, but they tie up your computer during capture. A two-hour tape takes two hours to digitize, and your computer needs to stay on and running the capture software the entire time.
Standalone converters work independently, recording to USB drives or SD cards. They’re more expensive but free up your computer and often include preview screens. For large collections, standalone units save significant time and hassle.
Input Options: RCA vs S-Video
All VHS players output composite video through RCA cables (the yellow connector). Higher-end VCRs from the 1990s and 2000s often include S-Video output, which delivers noticeably better color separation. If your VCR has S-Video, prioritize capture devices that support it.
Most devices in this guide include both RCA and S-Video inputs. The quality difference is worth using S-Video whenever possible – you’ll see sharper edges and less color bleeding, especially on tapes with lots of motion.
Software Considerations
USB capture devices require software. OBS Studio is free, powerful, and works on Windows, Mac, and Linux. It has a learning curve but offers the best quality control. QuickTime Player on Mac is simpler but less flexible. Some devices include proprietary software, which ranges from adequate to terrible.
Standalone converters generally don’t need software – they handle recording internally and save standard MP4 files you can edit with any video application later.
Resolution and Quality Expectations
VHS resolution is approximately 333×480 pixels for NTSC tapes. Any capture device claiming to deliver “HD quality” from VHS is upscaling, not extracting more detail. Upscaling can make video look sharper on modern screens but doesn’t add information that wasn’t on the tape.
For archival purposes, capturing at native resolution without upscaling preserves the original quality most accurately. For viewing on modern devices, modest upscaling to 720p or 1080p produces files that look better on TVs and computers.
Price vs Value Analysis
Budget capture cards ($15-40) work fine for occasional use and small collections. Mid-range options ($70-130) offer better reliability and features. Premium standalone units ($180-200) provide the most convenient experience for large projects.
Consider how many tapes you have and what your time is worth. A $150 standalone converter that saves you 20 hours of computer babysitting might be worth it compared to a $30 USB device that requires constant attention.
How to Convert VHS Tapes to Digital: Step-by-Step
Having the right capture card is only half the battle. Here’s the actual process I use when digitizing tapes, refined over dozens of hours of testing.
Step 1: Gather Your Equipment
You’ll need: a working VCR (preferably one that was high-end in its day), your capture device, blank storage media (USB drive or SD card for standalone, computer storage for USB devices), and RCA or S-Video cables. Clean your VCR heads with a cleaning tape if you haven’t used the machine recently.
Step 2: Connect Your VCR to the Capture Device
Use the highest quality connection your VCR supports. S-Video beats RCA composite. Connect audio using the red and white RCA connectors. If using a USB capture device, plug it into your computer. For standalone units, insert your USB drive or SD card.
Step 3: Configure Your Software Settings
For USB devices, open your capture software before turning on the VCR. In OBS, create a new source using your capture device. Set resolution to match your source – 720×480 for NTSC VHS. Use MP4 or MKV container format with H.264 video codec. Set bitrate to at least 8 Mbps for good quality.
Step 4: Start the Transfer Process
Insert your tape and rewind to the beginning. Press play on the VCR and immediately start recording on your capture device or software. Let the tape play completely – don’t stop and start, as this can cause audio sync issues. Monitor the first few minutes to ensure everything is capturing correctly.
Step 5: Edit and Store Your Digital Files
After capture, review your file to check quality. Trim any blank sections at beginning and end. Consider creating backup copies on cloud storage or external drives. VHS tapes are analog and degrade, but digital files can last forever with proper backup practices.
Frequently Asked Questions
What is the best VHS to digital converter?
The ClearClick Video to Digital Converter 2.0 is our top recommendation for most users. It requires no computer or software, has a built-in preview screen, and records directly to USB or SD card. For budget-conscious users comfortable with software, the VIXLW USB capture card offers excellent value at a lower price point.
How long does it take to convert VHS to digital?
VHS to digital conversion happens in real-time – a two-hour tape takes two hours to digitize. Standalone converters let you walk away during the process, while USB capture devices require your computer to stay on and running capture software. Plan your digitization project accordingly – a collection of 20 two-hour tapes will take 40 hours minimum to complete.
Can I improve the quality of VHS tapes when digitizing?
You cannot add detail that isn’t on the original tape, but you can optimize the transfer. Use S-Video instead of RCA cables if your VCR supports it. Clean your VCR heads before starting. Adjust brightness, contrast, and color levels during capture. Some software offers noise reduction filters, though these can sometimes remove wanted detail along with the noise.
What file format should I use for VHS digitization?
MP4 with H.264 encoding offers the best balance of quality and file size for most users. It plays on virtually any device and streams well. For archival purposes, some enthusiasts prefer lossless formats like AVI with uncompressed video, but these files are massive – roughly 10x larger than H.264 MP4s. A two-hour VHS tape in MP4 format is typically 2-4GB.
Do I need a working VCR to convert VHS tapes?
Yes, you need a functioning VCR to play the tapes during digitization. The quality of your VCR affects the final result significantly. Higher-end VCRs from the 1990s and early 2000s typically produce better transfers than cheap 1980s machines. If you don’t have a working VCR, check thrift stores, estate sales, or ask family members before buying one online.
Final Thoughts
Preserving old VHS tapes is one of those projects that gets harder the longer you wait. Magnetic tape continues degrading every year, and working VCRs are becoming harder to find. The best capture cards for VHS to digital conversion give you the tools to rescue those memories while you still can.
For most users, the ClearClick Video to Digital Converter 2.0 offers the best balance of simplicity, quality, and features. Its standalone operation removes the complexity that stops many people from starting their digitization project. If budget is your primary concern, the VIXLW USB capture cards deliver surprising quality for the price.
Whichever device you choose, the important thing is starting soon. Those tapes won’t wait forever, but digital files can last generations with proper care. Start with your most precious memories and work from there. By this time next year, you could have your entire VHS collection safely preserved in digital format.